Configure High Availability and Scalability
This page outlines the steps to configure Appsmith Google Cloud Run installation for high availability and scalability.
Prerequisites
- A Google Cloud account.
- An Appsmith Commercial Edition installation on Google Cloud Run. If not installed yet, see the Google Cloud Run installation guide for installing Appsmith.
- For scalable, secure, and highly available services, enable Memorystore for Redis API.
- Ensure that you have taken a manual backup for your instance.
Create a Redis instance
-
Go to the Memorystore for Redis page in the Google Cloud console.
-
Click Create Instance.
-
On the Create a Redis instance page, enter the configurations as shown below:
- In the Instance ID field, set an id. Example:
instanceid. - In the Tier Selection list, select one of the options:
- Basic: One primary Redis node. No automatic failover for High Availability.
- Standard: Provides High Availability and fails over to replica in case of primary node failure. For more information about tiers, see Redis Tier Capabilities.
- In the Capacity box, enter
10. - In the Region box, select a region for your instance.
- In the Zone box, select a zone for your instance.
- If you selected the Standard tier above, in the Configure read replicas dropdown list, select 2 Read Replicas .
- Under Set up connection, select the default option for Network.
- Expand the Configuration section. Select 6.x option(recommended) for Version.
- In the Instance ID field, set an id. Example:
-
Click the Create button.
-
Once the Redis instance is ready, note down the Primary Endpoint to use later.

Edit and deploy new revision
- Go to your cloud run console.
- Select your Appsmith Service, and click EDIT & DEPLOY NEW REVISION.
- Under Environment variables, click Add Variable button to add below variable in the Name and Value text boxes as shown below:
| Name | Value |
|---|---|
| APPSMITH_REDIS_URL | If you followed the steps in the Create Redis Instance section, add the host and port from the Primary Endpoint of the Redis instance you noted down in step 5. Ensure that there is no trailing spaces in the Redis URL. Format: redis://<HOST>:<PORT> |
- Click Deploy button. A green check mark will appear next to the newly deployed service name when it's ready.
- Verify that the new revision is working as expected by accessing Appsmith, and logging into your account.
- Again click EDIT & DEPLOY NEW REVISION.
- Scroll down to the bottom of the page, and uncheck the Serve this revision immediately checkbox.
- Click Deploy button. A green check mark will appear next to the newly deployed revision when it's ready.
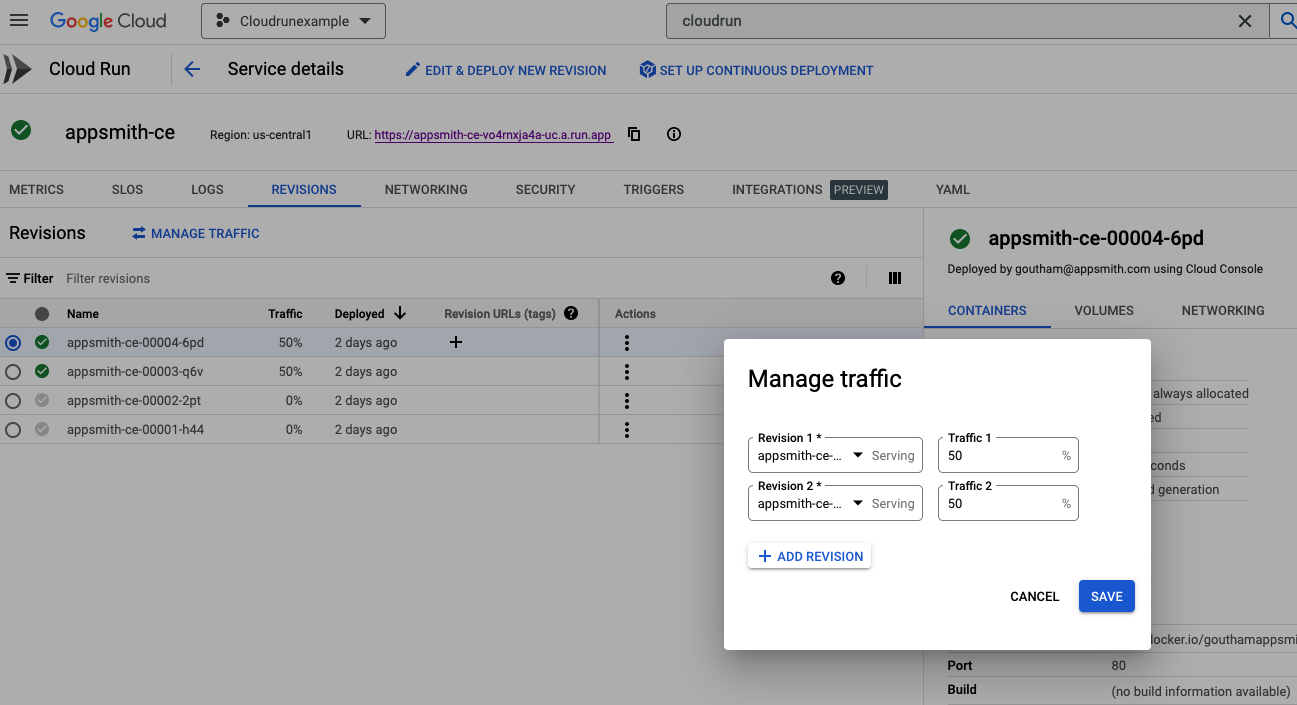
Manage traffic between revisions
Follow the steps below to split traffic between among revisions.

- Go to Cloud Run.
- Locate the service in the services list, and click on it.
- Click the Revisions tab.
- Click the MANAGE TRAFFIC button.
- Select the revisions that you created as part of Edit and deploy new revision section.
- Specify the traffic percentage that you want to assign to each revision.
- Click Save.
Troubleshooting
If you face issues, contact the support team using the chat widget at the bottom right of this page.